
Thursday, November 17, 2011
Friday Night Sew In
Friday, November 04, 2011
Following The Leader - Quilt Pattern
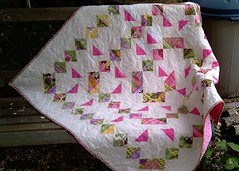
I did it! I designed a quilt, built it twice and wrote a pattern.
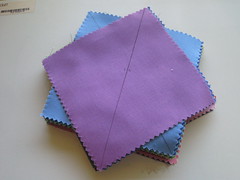
You might remember the above example from this post.
Whew!
Writing a pattern is a ton of work!
Please let me know if you find any errors.
Following the Leader
Finish size:
48 ¾” x 48 ¾”
the directions assume you have basic sewing skills.
all seams are 1/4".
all seams are 1/4".
Materials
· - Maze - 1 charm pack - OR - (35) 5" squares
· - Background - 3 yards - OR - 2 ½ yds and a matching solid charm pack
· - Geese and Binding - 1 1/4 yd
· - Backing – 3 yards
Cut and Prep
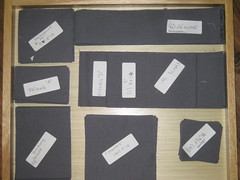
I always label my pieces when I’m cutting out a whole quilt. Otherwise I’d never remember what I cut. I use either bits of paper pinned to the top piece or blank labels.
You only need 35 charms. The rest are extras.
Background Fabric -
Cut (8) 4"x WOF strips – sub-cut these strips into:
·
(28) 4"x 2 1/2" - label as "A"
· (1) 4"x7 1/2" - label as "B"
·
(2) 4"x 36" - label as "C"
·
(2) 4"x 42 1/2" - label as "D"
·
(25) 4" squares - label as "bkgd sq"
Cut (2) 2 3/4" x WOF strips – sub-cut into:
·
(28) 2 3/4" sq - label as "goose corners"
Cut (6) 2 1/2"x WOF strips - label as "border"
DO NOT DO this next step
if you’re using a solid charm pack.
Cut (8) 5"x WOF strips – sub-cut into
·
(35) 5" squares - label as "charms"
If you’re using a solid charm pack, you only need 35 charms.
Goose and Binding Fabric -
Cut (1) 5" x WOF – sub-cut into
·
(7) 4 3/4" sq. - label as "geese"
Cut (1) 18"x WOF - label as "binding"
Binding
Whenever possible I make the binding first. I'm so impatient for the quilt to be done that I don't want to stop and take the binding when it's time to use it. I'd rather have it ready to go.
I cut my
strips at 2 ½”.
Feel free to use whatever method works for you.
Building the
Geese Units
These units use:
(28) Goose Corners
(7) Geese
(28) "A" rectangles
I found this method of building flying geese units from sophie. Follow the directions there, using the "geese" and "goose corners". The squares we've cut are slightly larger than the math in the directions calls for. I like having a bit of wiggle room to square them up when I'm done.
You should end up with 28 flying geese.
Now we turn them into squares.
Sew an “A” piece to the bottom of the goose.
Make 18 of these.
I’m calling these Top Geese. (original, right?)Sew an “A” piece to the tip of the goose.
Make 10 of these.
I’m calling these Bottom Geese.
I’m calling these Bottom Geese.
Square them all up to 4" and set aside.
Building the
Maze Units
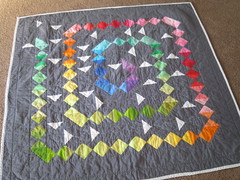
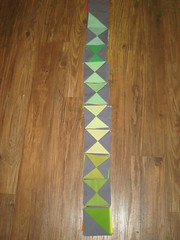
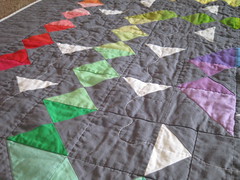
**These directions will
not create the rainbow effect in my grey example, the maze will look more like
the other example.**
I pressed my seams open, which eliminated a lot of bulk. I also starched the crud out of them, so they stayed nice and square. I made my own starch, using this recipe.
These go together quickly if you chain piece them.
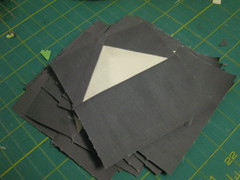
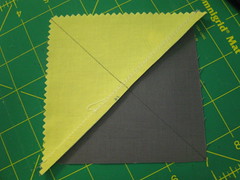
On the back of your maze charms draw a diagonal line, corner
to corner.
This is a cutting line, so it won't be seen.
Just be sure to use a pen that doesn't bleed, I used a ball point pen.
This is a cutting line, so it won't be seen.
Just be sure to use a pen that doesn't bleed, I used a ball point pen.
Sew a maze charm and a solid charm together ¼” from the
center line.
Run it thru the machine again, sewing a ¼” from the other side of
the center line.
Cut on the center
line. Press.
You now have 70 Half Square Triangles. Pull 12 of these. Trim to 4”. These are the "maze corners." Set aside.
You now have 70 Half Square Triangles. Pull 12 of these. Trim to 4”. These are the "maze corners." Set aside.
Pull 29 blocks. On the back of each of these blocks, draw a diagonal line corner to corner, opposite the existing seam.
Pair up each marked block with an unmarked one.
Following the steps above, sew ¼” seam on both sides of the line.
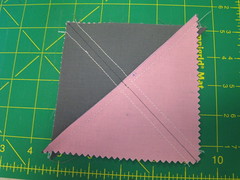
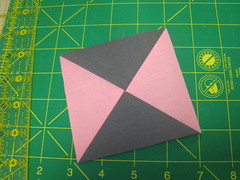
Cut. Press. Trim the blocks to 4".
Building the Borders
You can look at the layout drawing under "putting it all together", if these directions are confusing.
Inner Border:
For this step we need:
· (1) Top Goose
· (1) Bottom Goose
· The “B” piece
· (2) “C” pieces
· (2) “D” pieces
Sew the Bottom Goose to the left end of a “C” piece. – This is your Top Border.
Sew the “B” piece to the tip of the Top Goose. Sew the other “C” piece to the other end of the Top Goose. – This is your Left Border.
The Bottom and Right Borders are the “D” strips, no sewing required.
Outer Border:
For this step we need:
· (6) “border” strips.
Piece the strips together to create the lengths needed. We need :
· (2) 2 ½” x 46”
· (2) 2 ½” x 50”
Putting it All Together
You should have:
· 58 maze blocks
12 maze corners17 top geese
9 bottom geese
25 “bkgd sq”
Now the fun part.
Using the picture below, lay out your maze and geese.
When you're happy with the placement, snap a picture of the layout to use as a reference.
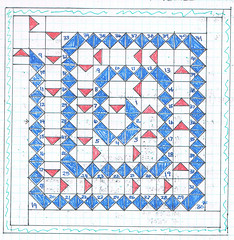
please ignore the itty-bitty numbers, they helped me make the rainbow effect.
Now, sew the blocks into rows.
Here's what I do, so I don’t get them mixed up as I sew the rows together.
Stack the blocks in each row, with the left-most block on top.
Clip the stack together AT THE TOP.
The clips I use leave a nice impression on the top of the block, which helps me keep them oriented correctly.
The clips I use leave a nice impression on the top of the block, which helps me keep them oriented correctly.

Before you sew them together, place a pin in the upper left
corner of the top block.
Now, sew the blocks into rows. Press.
Lay out the rows again to double check placement.
Sew the rows together.
Adding the Borders
Inner Border:
Sew the Top Border on first, then clockwise on the next three. These pieces are slightly longer than you
need. You can trim of the extra after
you attach it to the center.
Outer Border:
Sew the top and bottom borders on, then add the sides.
Quilt, Bind and Enjoy.
whew! my first pattern. what do you think?
Finish it up Friday
My finish for the week is very special to me, it is an original design by me, and I wrote a pattern for it.
I created the design for the Eugene Modern Quilt Guild's solids challenge.
I built a tester one this spring for my niece, before breaking into the charm pack I was given.
I was waiting until I had shown it at a meeting before blogging about it, but I have determined that I'm only going to be able to attend the meetings once in a blue moon, given the work/travel schedule of Mr. Chaos and the lessons/school schedule of my children.
So, wanna see?
Following the Leader
it finishes at just under 49" square.
and I pieced the back -
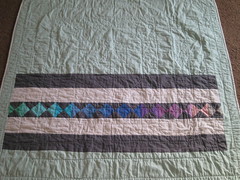
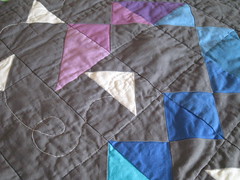
up close on the quilting...
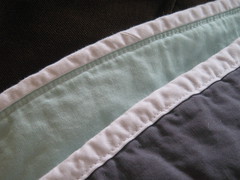
and I machine sewed the binding on.
I've been trying to figure out a way to make it look as nice as when I hand sew it, but I HATE hand sewing.
I've been trying to figure out a way to make it look as nice as when I hand sew it, but I HATE hand sewing.
I think I like how it turned out.
The pattern can be found here.
:)
Wednesday, November 02, 2011
Help! I Can't Decide!
I just spent the last 2 hours browsing for fabric online. Generally I start at Fat Quarter Shop and then see if I can beat the price elsewhere. I like their pictures of the collections.
What was I shopping for? I'm doing a totally wonderful trade with a knitting friend of mine, Maiya.
She blogs at Maiya knits. Mayhem ensues.
I'm making her an advent calendar and she's knitting a few gifts for me.
I hate picking fabric for other people! What if they don't like it?
I've decided to use a charm pack, I figured that would give me the most variety at the least cost.
She asked for something fun and funky - she's got two little boys.
Not a lot of options out there.
I looked at Santa's Little Helpers

but her kids are afraid of sock monkeys. don't laugh, mine are too.
After searching more I've narrowed it down....

which I love, but I'm not sure it's "fun" enough...

which I can't find in charm packs - I'd have to buy a layer cake... (oh darn)
and

What do you think?
Are there other fun and funky collections I've missed?
Subscribe to:
Posts (Atom)